Web Energy Logger
- - What is the WEL?
- - How does it work?
- - Purchase Online
- - User Map / Info.
- - OurCoolHouse
Tech Support
WEL Logging (Users)
WEL Display (Users)
Web Energy Logger: Performing a Firmware Update
Beginning with firmware version 2.0, the WEL stores it's operating software as a file in Flash memory. Just like a regular PC, the first thing the WEL does on reset is boots this program into RAM and then starts executing. The advantage of this system is that it's possible to load a new program into flash, without destroying the current program. New programs are loaded via the Ethernet connection, using a program called an "Update Manager". The Update Manager first locates the WEL on the network, it then temporarily halts the current program. The user (you) can then inspect the flash file system and load a new program, either replacing the existing program, or keeping it in Flash as a backup. New programs exist as "Binary Image" (.bin) files. The latest .bin file, as well as the UpdateMGR.exe file, can be downloaded from my Support Files page.
WARNING: At this time, Software Updates DO NOT work over a wireless connection. Ensure that both your WEL and Computer are connected to the network via hard-wired cables.
CAUTION: As a last ditch safety-net, you should print out your WEL Device Names page to have a hardcopy of your 1-wire address-name combinations.
Here are the detailed steps for loading a new program onto the WEL. It
assumes that you have downloaded the UpdateMGR.exe program and the latest .bin
file.
In the screen dumps shown here, the current program running on the WEL is Rev
2.15 and it's being updated to Rev 2.16. You can determine the WEL's current
version by simply logging onto the WEL's home page. The version and date
are shown at the top of the screen.
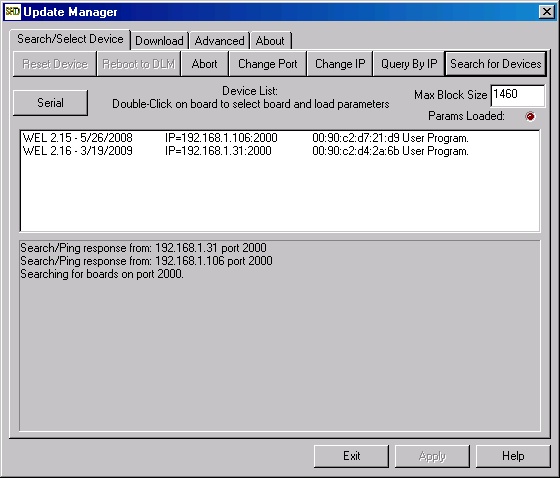 |
Step 1 Locate the WEL Run the Update Manager by double clicking its Icon in Windows Explorer. This is the expected display screen.
If the WEL has been reset/powered up since starting
the program, you may need to click the Search
For Devices button. This screen shows a typical response. In this case I have TWO WELs on my network. You can see that a WEL with IP Address 192.168.1.106 has
responded and indicated that it is running a "User Program".
We are going to update the 2.15 program to 2.16. Double-Click on the first desired WEL (in this case, the first line) in the device list. this will prompt the popup shown next.
|
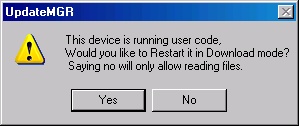 |
Step 2 Restart the WEL program in download mode. This popup is indicating that in order to download a new program to this WEL, you need to restart the BIOS in download mode. Click Yes.
|
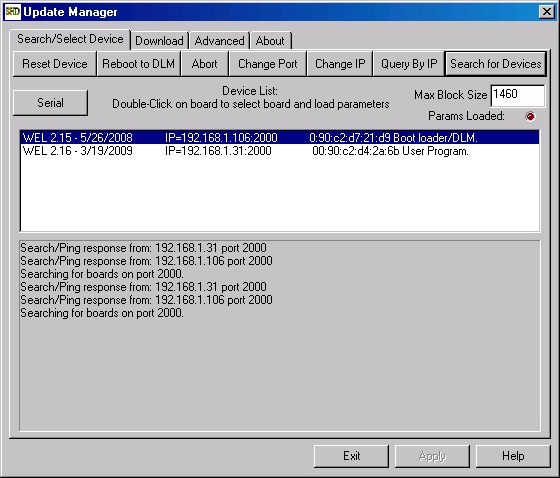 |
Step 3 Wait for WEL program to restart. The Update Manager will send a reboot command to that WEL. If the WEL is visible from your location, you will see polling halt and the LAN activity light will pulse slowly. The Device list will be cleared and after several seconds the
Update Manager will search for WELs again.
|
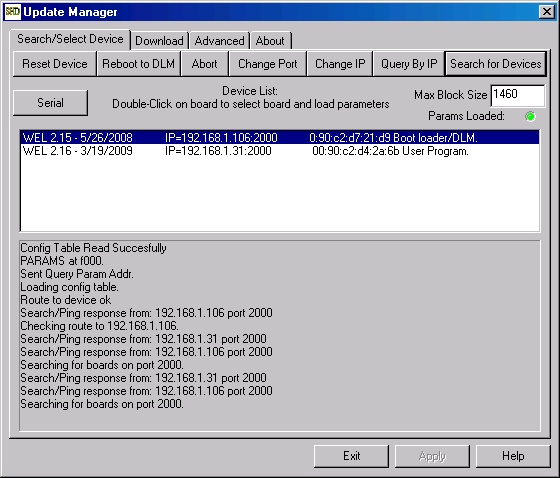 |
Step 4 Wait for WEL program to restart. Double Click on the desired WEL line again and you will see the status message "Config Table Read Successfully" appear below. Once this has occurred, the Download Tab will be enabled. WARNING: This is where problems will start if you are on a wireless network. Ensure that both your WEL and Computer are connected to the network via hard-wired cables.
Note: If the current Update Manager is used to locate WEL's with
revision 2.15 or less, you will get a different completion message. Ultimately, you need the screen to indicate that the Config Table was read succesfully.
|
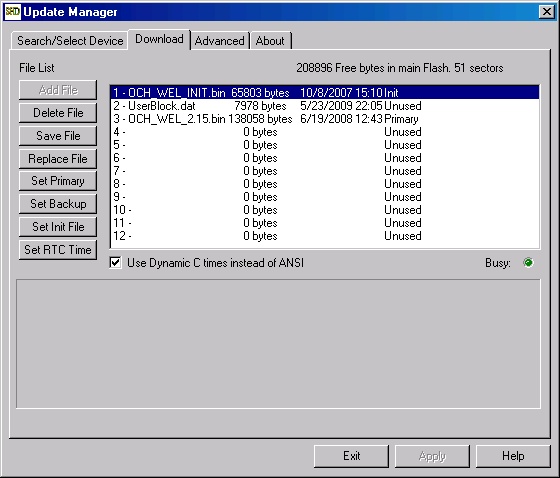 |
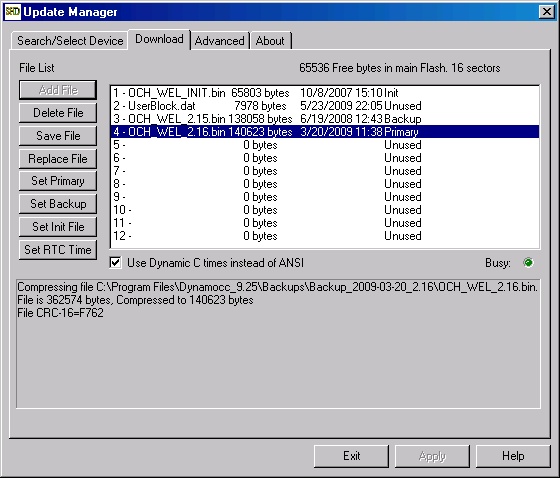
Step 4 Prepare for the download process. Click on the Download tab and you should see a screen like the one shown to the left. The list shows the files currently loaded into the Flash file system. The first file (1) will be the WEL Boot program (OCH_WEL_INIT.bin). The second file (2) will be the configuration information for your particular WEL (UserBlock.dat). Neither of these files should be changed in ANY WAY! The third file (3) shown here is the current program (OCH_WEL_2.15.bin). It is marked as "Primary" which means it will be booted on startup. We want to change this file's status to "Backup" so we can load a new primary.
|
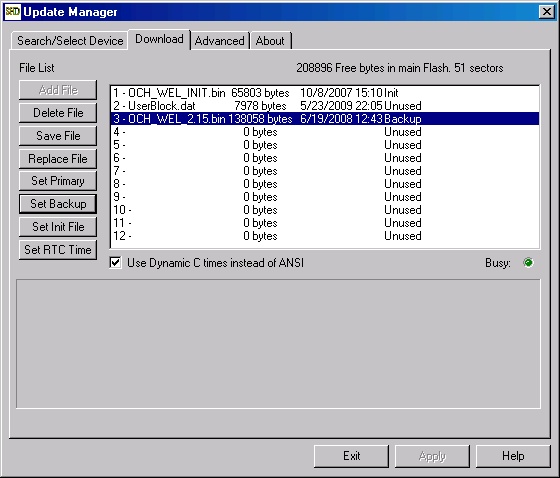 |
Step 6 Back up the current program. Click on the OCH_WEL_2.15.bin file to select it and then click the Set Backup button. The screen should end up as shown here. For extra safety, you can also save a copy of your "User Block". This is the file which contains ALL of your system settings and device configurations. Just click on the "UserBlock.dat" file and then click "Save File". DANGER: Be Careful NOT to click Delete or Replace File in this step. You will be prompted with a "Save As" dialog where you can indicate where you want the file saved. Put it somewhere you can remember, in case you want to re-load it into the WEL at a later date. This is also a great way to backup your WEL settings in case of a catastrophic board failure. |
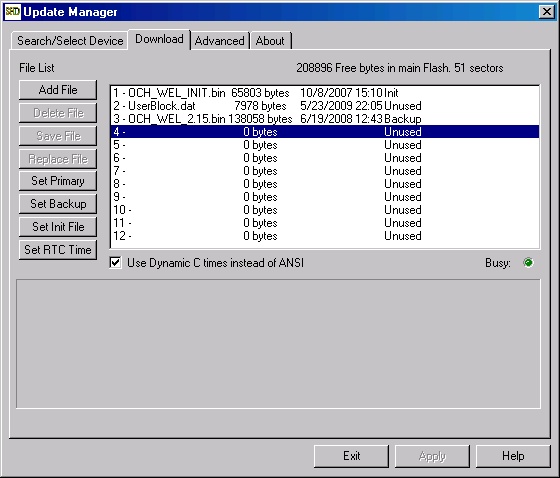 |
Step 7 Adding a new file. We will add the new program into file slot four (4). So click this line to select it, and then click the Add File button. An "Open File" dialog will popup as shown next. Note: If you already have a backup program in flash, then you can Replace that file with the new program, and make the current program the backup.
|
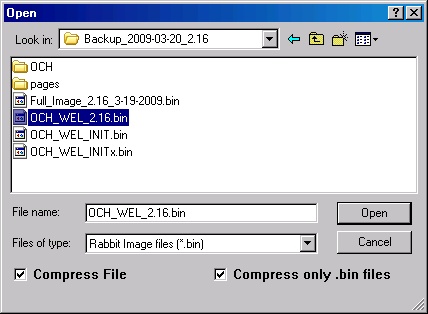 |
Step 8 Select the new binary image Navigate to the new binary image (.bin file) you downloaded from this website and select it. Make sure the Compress File box is
checked. Click Open to finish the selection process.
|
 |
Step 9 Downloading the file. Once the selection has been made, the file will be downloaded in compressed form. Once it's finished, the new file should be shown in the file list (OCH_WEL_2.16.bin) and it should be marked as "Primary". Your system is now ready to be re-booted to run the new program. |
 |
Step 10 Rebooting.
You must now re-boot
the WEL to start it using the new program. Switch back to the Search/Select Device tab, and click on the Reset Device button. This will reboot the board. After about a minute, click the Search For Device button again and see that the new software revision is reported.
|